Yuyu Billing in OpenStack Horizon
Yuyu adalah sebuah Plug-in yang membantu untuk mengelola Billing di OpenStack dengan mengambil data dari setiap event di OpenStack, di Yuyu sendiri, kita bisa mengatur untuk harga dari sebuah Flavor, Images, Networking, bahkan Volume. Keuntungan Yuyu:
- Laporan Akurasi Tinggi, karena tidak perlu repot mengkalkulasi biaya yang dikeluarkan di environment OpenStack, karena sudah di hitung secara presisi.
- Real-Time Management, jad tidak berpaku pada waktu tertentu.
- Manage pengeluaran biaya, jadi ada peluang untuk penghematan biaya karena perhitungan yang presisi.
-
Install dependencies yang dibutuhkan, dan clone repository atau ambil source code dari horizonnya.
bashroot@controller:~# apt update root@controller:~# apt install python3 python3-dev python3-venv python3-distutils apache2 libapache2-mod-wsgi-py3 memcached libmemcached-tools python3-setuptools python3-virtualenv -y root@controller:~# cd /var/www/html root@controller:~/html# git clone https://opendev.org/openstack/horizon -b stable/2023.1 --depth=1 root@controller:~/html# cd horizon -
Install bererapa dependensi dan library yang dibutuhkan oleh Horizon, dan pada file requirement pastikan tidak merubah versi dari “python-memcached” karena nantinya akan ada error tidak bisa logout jika di rubah versinya
bashroot@controller:~/horizon# pip install -U pip root@controller:~/horizon# wget https://opendev.org/openstack/requirements/raw/branch/stable/2023.1/upper-constraints.txt root@controller:~/horizon# sed -i 's/horizon===23.1.1/horizon===0.0.0/g' upper-constraints.txt root@controller:~/horizon# pip install -c upper-constraints.txt . root@controller:~/horizon# pip install -r requirements.txt root@controller:~/horizon# pip install python-cinderclient -
Copy file sample “local_settings.py”, dan konfigurasi file tersebut seperti di bawah ini.
bashroot@controller:~/horizon# cp openstack_dashboard/local/local_settings.py.example \ openstack_dashboard/local/local_settings.py root@controller:~/horizon# nano openstack_dashboard/local/local_settings.pypython# set debug value DEBUG = False # set allowed hosts ALLOWED_HOSTS = ['*'] # set cache backend CACHES = { 'default': { 'BACKEND': 'django.core.cache.backends.memcached.MemcachedCache', 'LOCATION': '{IP-OPENSTACK}:11211', #change {IP-OPENSTACK} with IP address VM }, } # set openstack-host and keystone OPENSTACK_HOST = "{IP-VIP-OPENSTACK}:5000" # change {IP-VIP-OPENSTACK} with Keystone Openstack API OPENSTACK_KEYSTONE_URL = "http://%s/v3" % OPENSTACK_HOST # set themes AVAILABLE_THEMES = [ ('default', 'Default', 'themes/default'), ('material', 'Material', 'themes/material'), ('example', 'Example', 'themes/example'), ] -
Buat softlink untuk python versi 3.10, agar memudahkan dalam pemanggilan fungsi pythonnya, dan agar sesuai versi yang dibutuhkan dari horizonnya.
bashroot@controller:~/horizon# ln -s /usr/bin/python3.10 /usr/bin/python -
lalu jalankan perintah collect static file untuk generate seperti CSS, JavaScript, Foto atau font yang digunakan.
bashroot@controller:~/horizon# ./manage.py collectstatic -
Generate file WSGI.
bashroot@controller:~/horizon# ./manage.py make_web_conf --wsgi -
Generate konfigurasi Apache untuk web Service nya.
bashroot@controller:~/horizon# ./manage.py make_web_conf --apache > /etc/apache2/sites-available/horizon.conf -
Lalu Enable config web Horizon dan Disable Default dari web Apache nya.
bashroot@controller:~/horizon# a2ensite horizon.conf && a2dissite 000-default.conf -
Lalu atur untuk permission dari directory static dan file WSGI.
<br>bashroot@controller:~/horizon# chown -R www-data:www-data openstack_dashboard/local/.secret_key_store root@controller:~/horizon# chown -R www-data:www-data static/ root@controller:~/horizon# chmod a+x openstack_dashboard/horizon_wsgi.py
-
Setting pada beberapa file berikut agar beberapa service ini bisa mengirim data ke RabbitMQ yang nantinya akan digunakan oleh Yuyu.
-
Konfigurasi “Nova” pada file ini “/etc/kolla/nova-scheduler/nova.conf”.
bashroot@controller:~# nano /etc/kolla/nova-scheduler/nova.confyaml[oslo_messaging_notifications] driver = messagingv2 topics = notifications [notifications] notify_on_state_change = vm_and_task_state notification_format = unversioned -
Lalu konfigurasi “Cinder” pada file ini “/etc/kolla/cinder-scheduler/cinder.conf”.
bashroot@controller:~# nano /etc/kolla/cinder-scheduler/cinder.confyaml[oslo_messaging_notifications] driver = messagingv2 topics = notifications -
Lalu konfigurasi ”Neutron” pada file ini “/etc/kolla/neutron-server/neutron.conf”.
bashroot@controller:~# nano /etc/kolla/neutron-server/neutron.confyaml[oslo_messaging_notifications] driver = messagingv2 topics = notifications -
Lalu konfigurasi ”Keystone” pada file ini “/etc/kolla/keystone/keystone.conf”.
bashroot@controller:~# nano /etc/kolla/keystone/keystone.confyaml[oslo_messaging_notifications] driver = messagingv2 topics = notifications
-
-
Lalu restart container dari service yang di setting tadi.
bashroot@controller:~# docker restart nova_scheduler cinder_scheduler neutron_server keystone -
Clone repository atau ambil source code Yuyu Api dan Yuyu Event Monitoring.
bashroot@controller:~# cd /var root@controller:~/var# git clone https://github.com/btechpt/yuyu.git root@controller:~/yuyu# cd yuyu -
Buat virtual environment python, agar saat membutuhkan versi tertentu dari library python, tidak akan berpengaruh ke system host langsung, dan install dependensi library python yang dibutuhkan
bashroot@controller:~/yuyu# virtualenv env root@controller:~/yuyu# source env/bin/activate (env) root@controller:~/yuyu# pip install -r requirements.txt -
Cek URL RabbitMQ dengan perintah berikut, yang nantinya digunakan saat konfigurasi “local_setting.py” pada Yuyu
bash(env) root@controller:~/yuyu# cat /etc/kolla/neutron-server/neutron.conf | grep transport_url -
Copy file “yuyu/local_settings.py.sample”, ke “yuyu/local_settings.py”, lalu konfigurasi file tersebut seperti berikut.
bash(env) root@controller:~/yuyu# cp yuyu/local_settings.py.sample yuyu/local_settings.py (env) root@controller:~/yuyu# vim yuyu/local_settings.pypythonYUYU_NOTIFICATION_URL = "rabbit://openstack:password@127.0.0.1:5672//" YUYU_NOTIFICATION_TOPICS = ["notifications"] -
Kemudian jalankan perintah ini untuk migrate database.
bash(env) root@controller:~/yuyu# python manage.py migrate -
Lalu jalankan berintah untuk membuat Yuyu Api Service dan Yuyu Event Monitoring.
bash(env) root@controller:~/yuyu# ./bin/setup_api.sh (env) root@controller:~/yuyu# systemctl enable yuyu_api (env) root@controller:~/yuyu# systemctl start yuyu_api (env) root@controller:~/yuyu# systemctl status yuyu_apibash(env) root@controller:~/yuyu# ./bin/setup_event_monitor.sh (env) root@controller:~/yuyu# systemctl enable yuyu_event_monitor (env) root@controller:~/yuyu# systemctl start yuyu_event_monitor (env) root@controller:~/yuyu# systemctl status yuyu_event_monitor -
Install Crontab untuk menjalankan script tersebut pada kurun waktu tertentu.
bash(env) root@controller:~/yuyu# crontab -e no crontab for root - using an empty one Select an editor. To change later, run 'select-editor'. 1. /bin/nano <---- easiest 2. /usr/bin/vim.basic 3. /usr/bin/vim.tiny 4. /bin/ed Choose 1-4 [1]: [pilih file editor apa sesuai nomor di atas] -
Nanti akan di arahkan ke file /tmp/crontab.uegsAD/crontab, lalu isikan seperti berikut ini. Lalu Save
bash1 0 1 * * /var/yuyu/bin/process_invoice.sh -
Kemudian nonaktifkan virtual environment python nya.
<br>bash(env) root@controller:~/yuyu# deactivate
-
Clone repository atau ambil source code Yuyu Dashboard
bashroot@controller:~# cd /var root@controller:~/var# git clone https://github.com/btechpt/yuyu_dashboard.git root@controller:~/yuyu_dashboard# cd yuyu_dashboard -
Setup untuk Yuyu Dashboardnya. Nanti saat disuruh memasukan lokasi directory dari Horizon, jadi bisa di sesuaikan, contoh untuk horizonnya di “/var/www/html/horizon”.
bashroot@controller:~/yuyu_dashboard# ./setup_yuyu.sh Enter horizon location and press ENTER. /var/www/html/horizon -
Install dependensi library python yang dibutuhkan untuk Yuyu Dashboard
bashroot@controller:~/yuyu_dashboard# pip3 install -r requirements.txt -
Tambahkan setting untuk dibagian horizon local_settings.py, agar dapat menghubungkan Horizon dengan Yuyu. Dan Bind ke IP localhost karena masih dalam 1 host yang sama, agar tidak dapat di akses oleh luar.
bashroot@controller:~/yuyu_dashboard# vim /var/www/html/horizon/openstack_dashboard/local/local_settings.pypythonYUYU_URL="http://127.0.0.1:8182" CURRENCIES = ('IDR',) DEFAULT_CURRENCY = "IDR" -
Restart Apache untuk Horizon dan Restart memcached
bashroot@controller:~/yuyu_dashboard# systemctl restart apache2 root@controller:~/yuyu_dashboard# systemctl restart memcached
Saat Login ke Dashboard, menggunakan credentials yang sesuai.
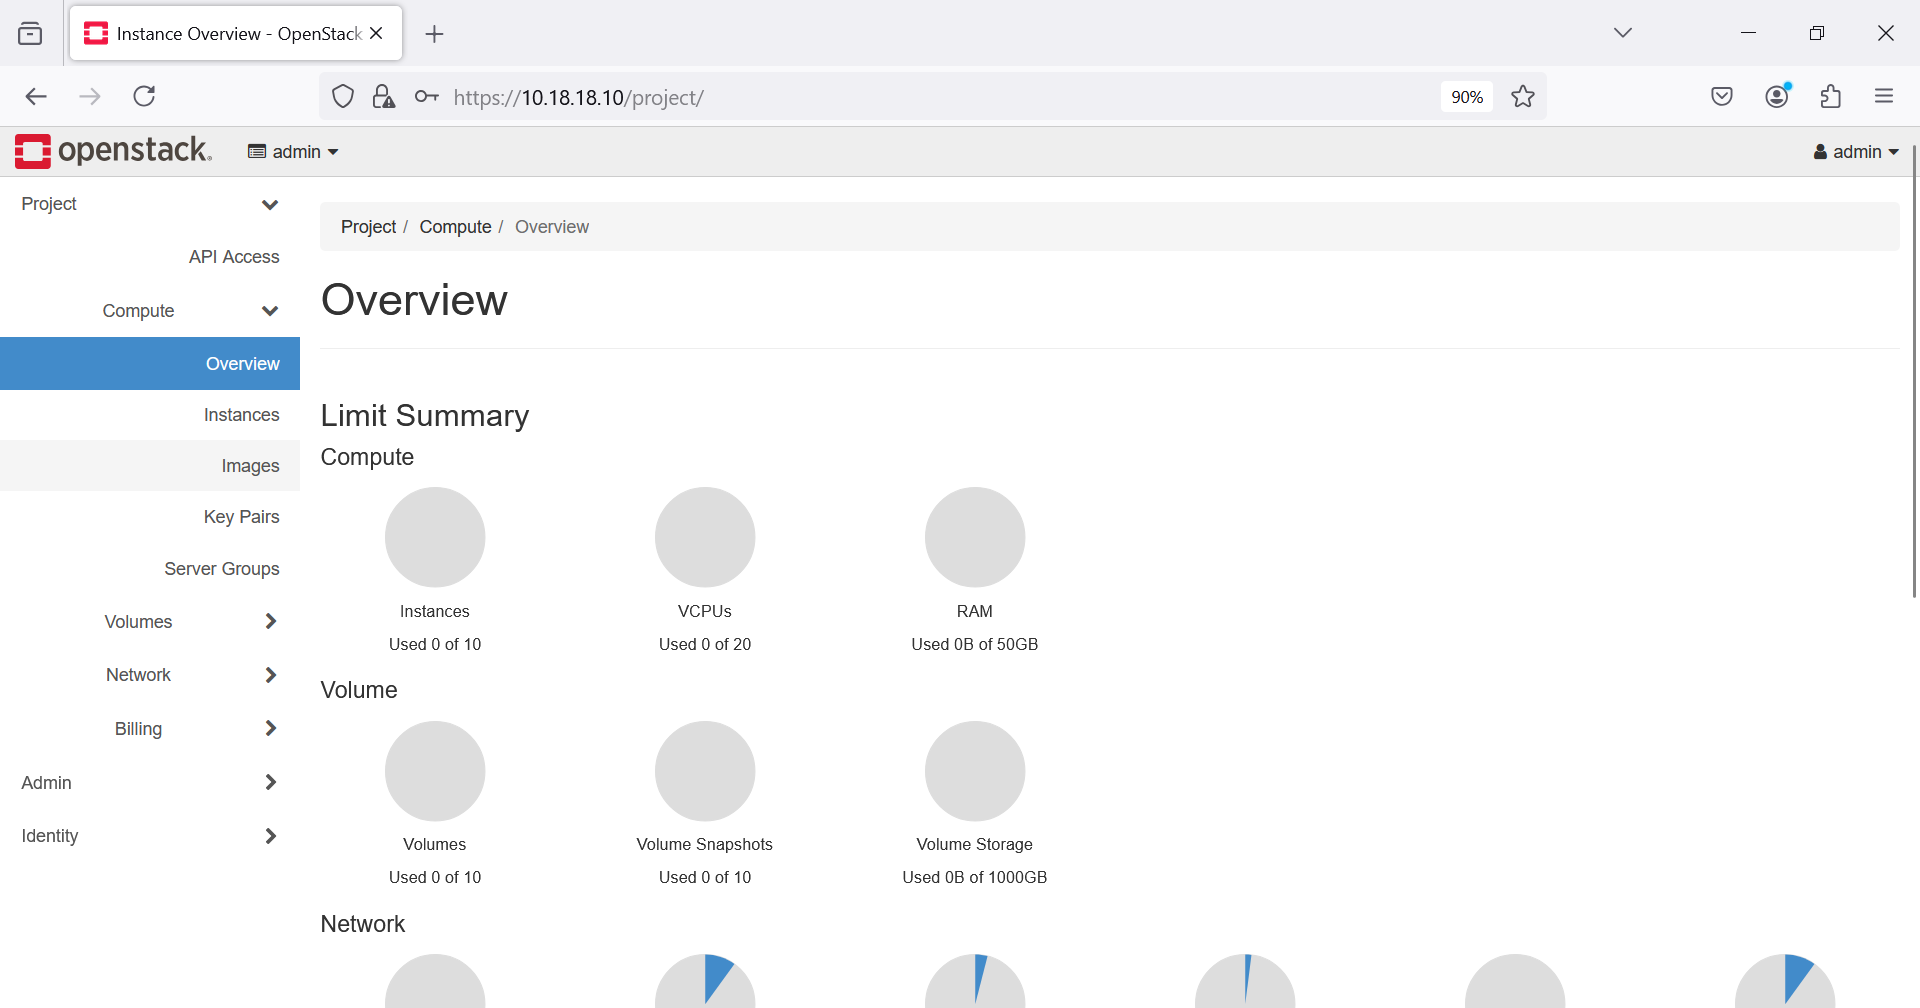
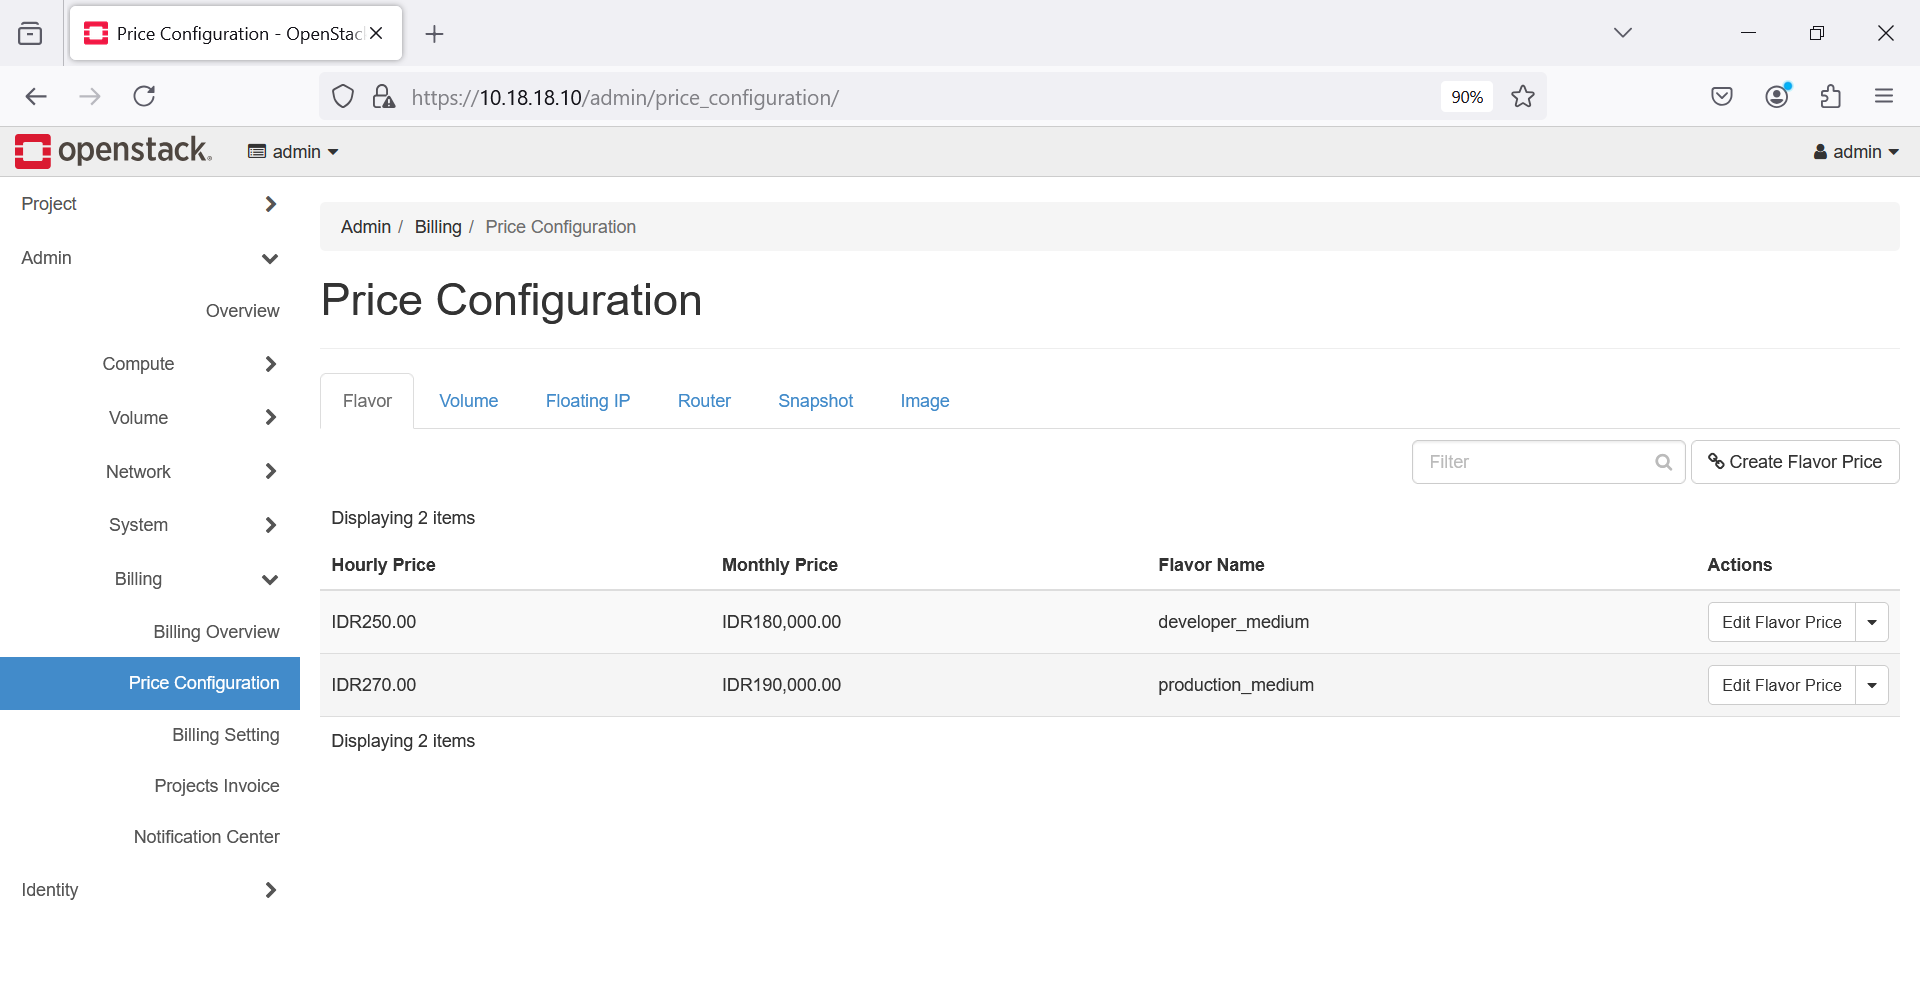
Dapat mengatur untuk Billing, di user Admin.
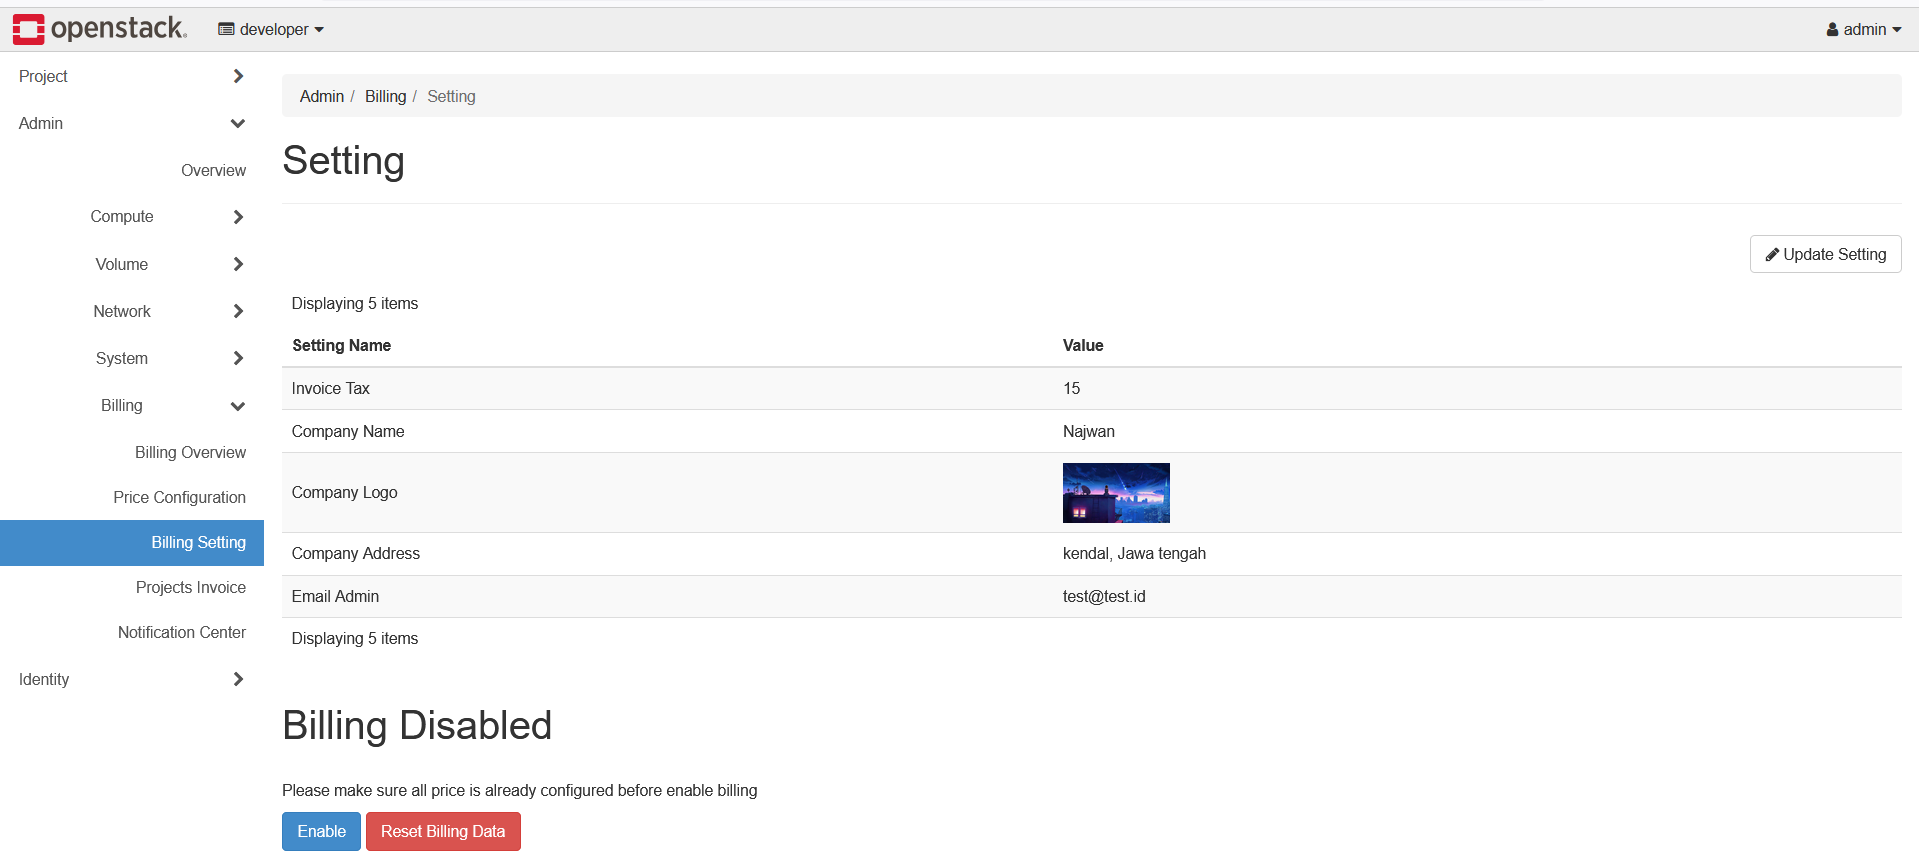
Dapat mengatur untuk Price/Harga dari resource yang digunakan.
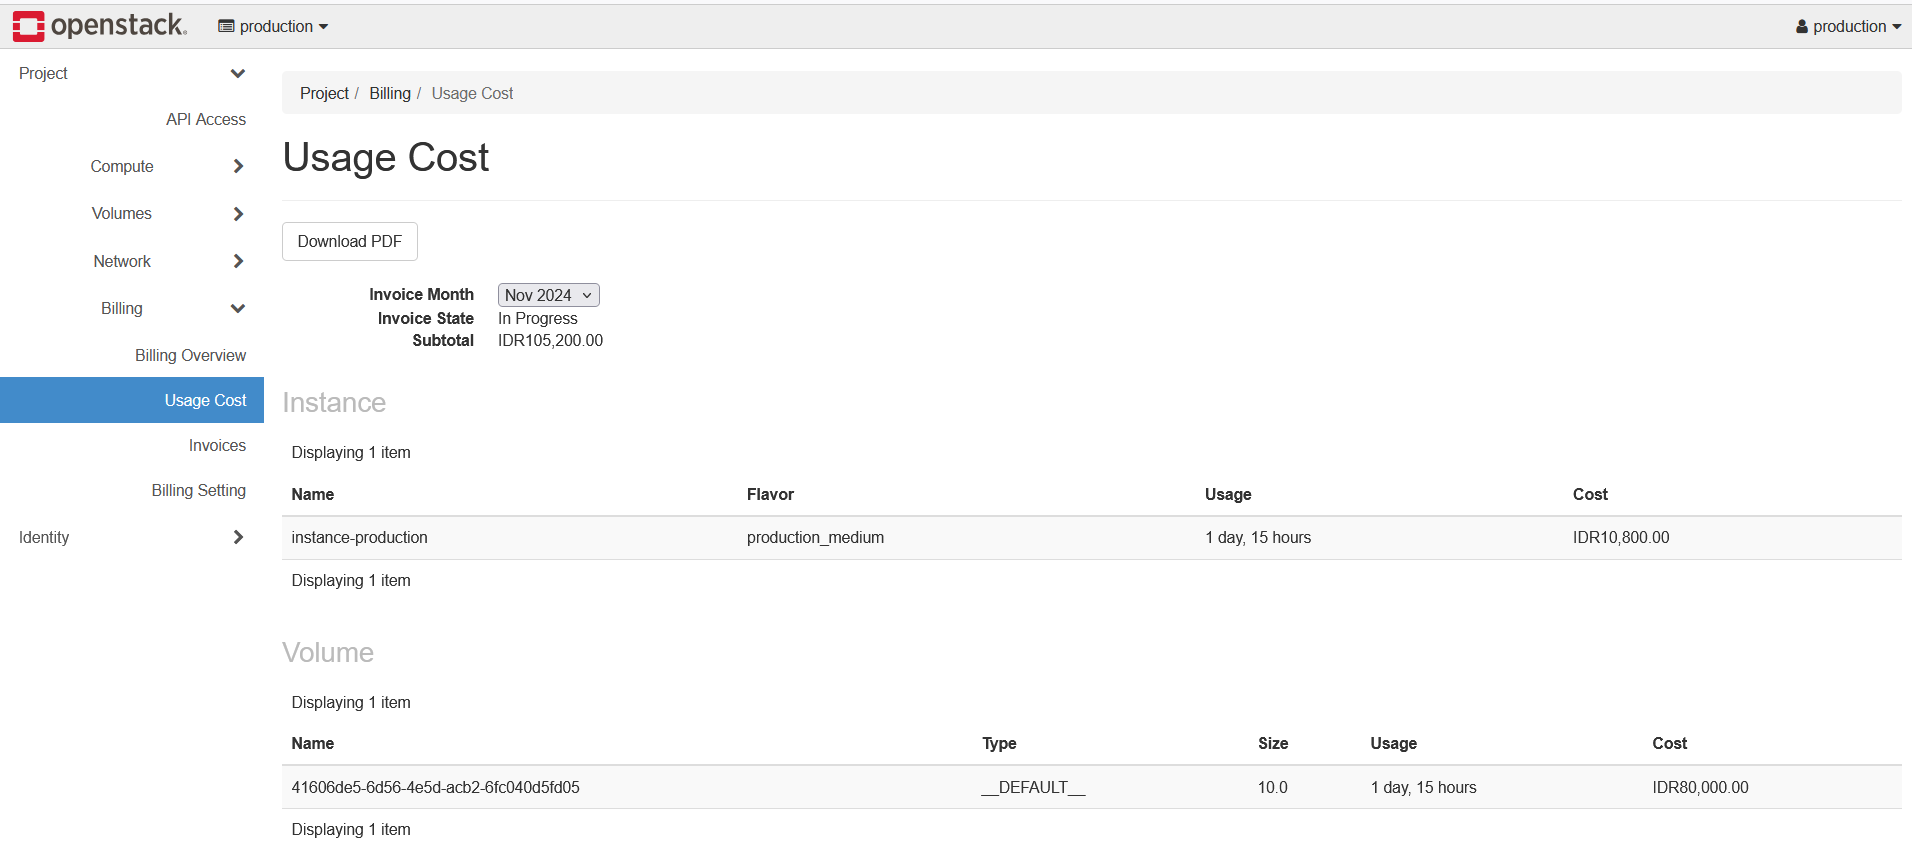
Dapat melihat harga penggunaan resource di project tertentu. Sesuai pemakaian resource
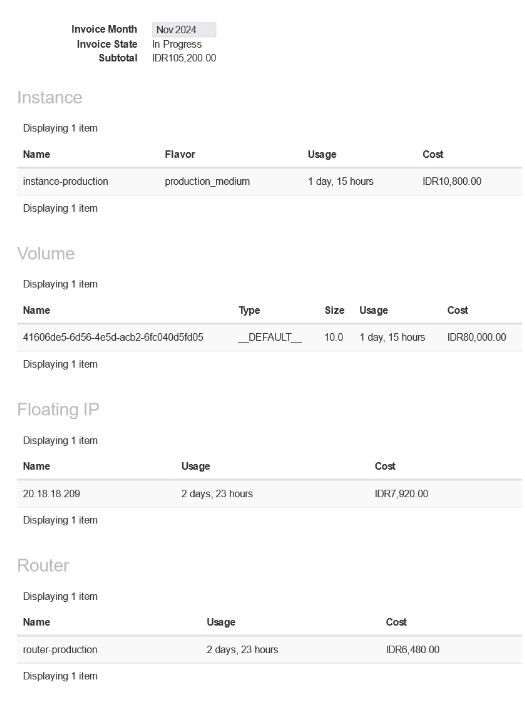
Dapat mendownload file usage cost, atau harga penggunaan resource
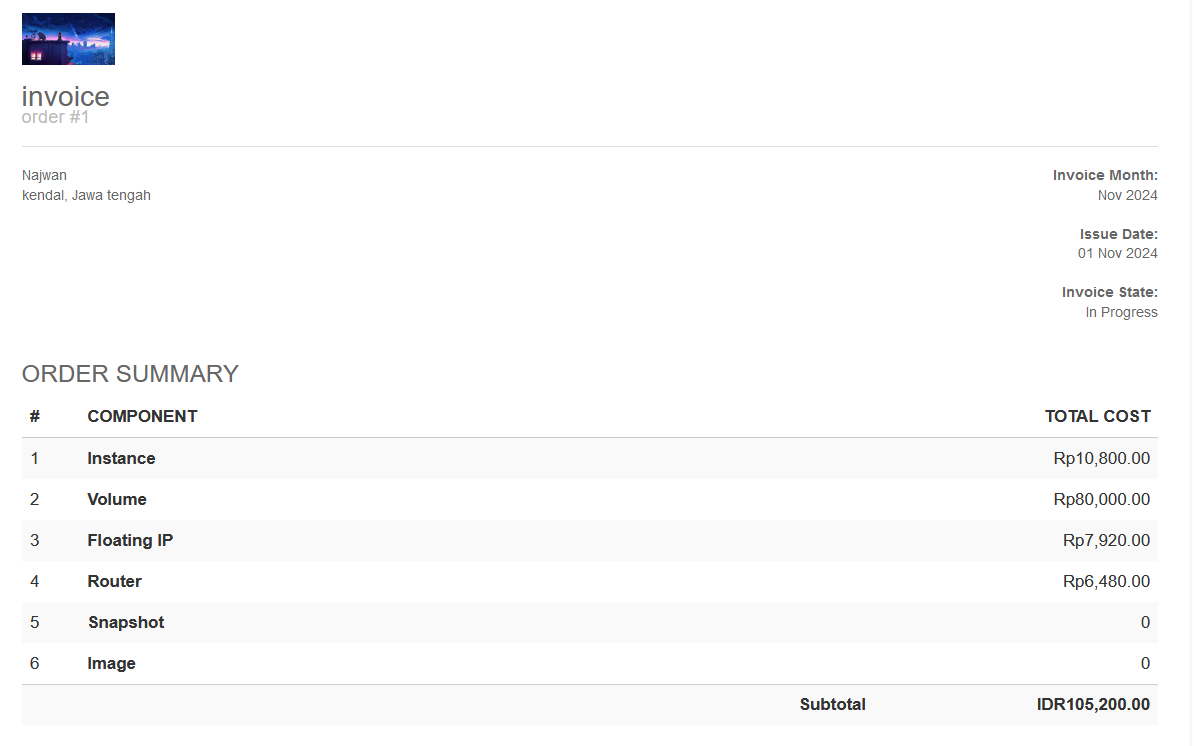
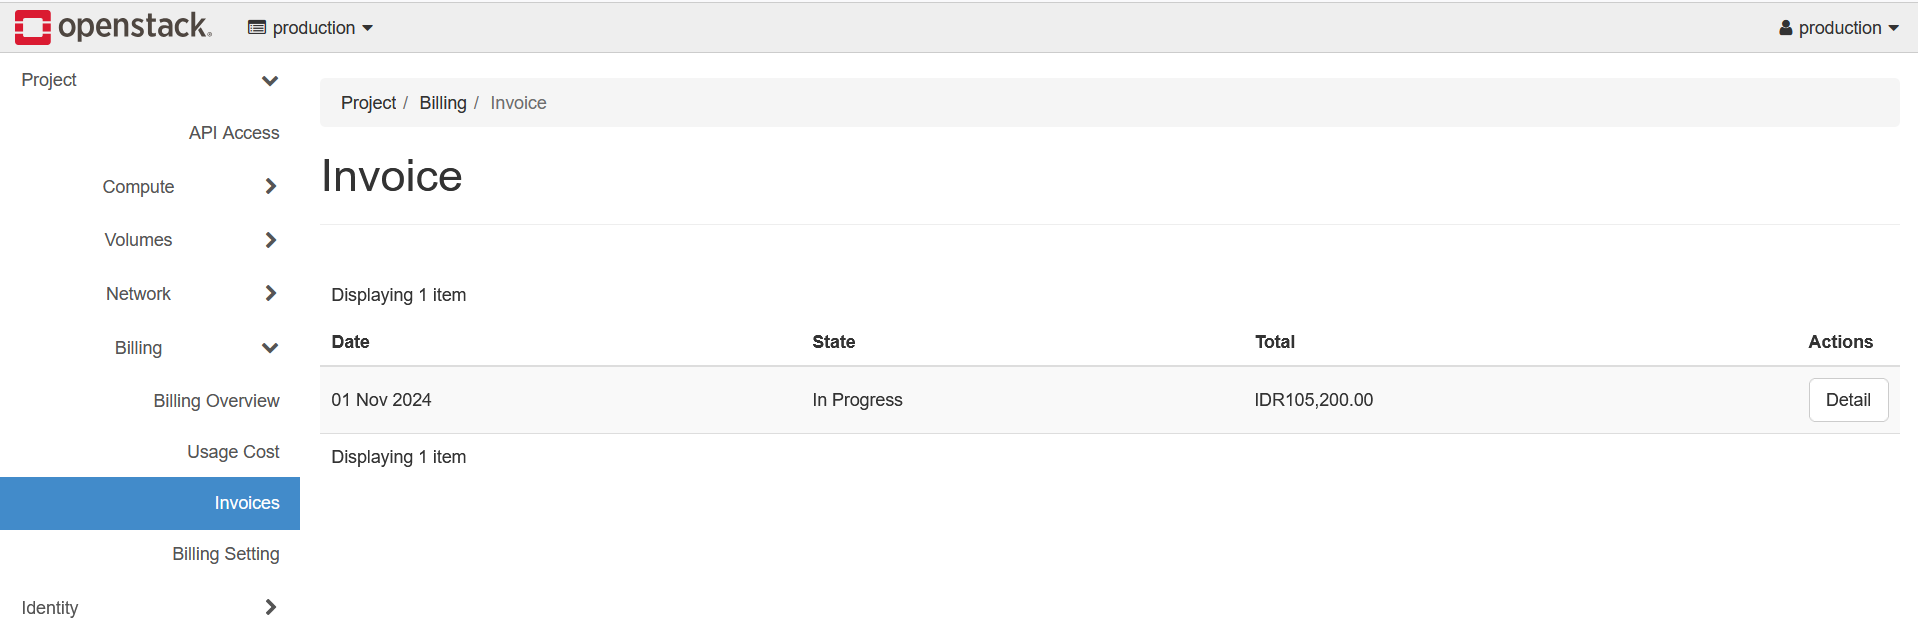
Dapat melihat invoice lewat Page Horizon
Dapat melihat invoice via file yang di download